Here you will find csome useful information about how breeds work.
Quick Links: [SLOTS and SLOT CONVERSION] [SPRITES] [ATT] [GENETICS]
1. General
inormation
With what you'll learn here you'll be able to change breeds from slots, which is
really handy in C2 where there are about 4 breeds a slot. So if you have two
conflicting breeds and want to change them this is how you go about it. For
C2, C3 and DS you could alternatively use the program Reslot.
These tutorials were written with C1 in mind, so we'll be focusing mainly on
that information.
First of all you should know what files are important for a breed. There are
sprite files (which contain the images off your breed), located in
the 'Images' folder of your creatures directory, att files (which
contain coordinates of where to attach limbs etc), in the 'Body Data' folder
and last, genetics files (which of course determine how your creature
is going to act), located in the 'Genetics Folder'.
Every sprite and att file consists of 4
letters/numbers: eg. a109.spr
a: this is the bodypart (see table below)
1: this is the genus (see table 2)
0: this is the age of your creature (see table 3)
9: this is the slot, a number from 0-9 in C1, a
letter from a-z in C2 and C3.
2. Table
| BODYPARTS | GENUS | AGE | SLOT | ||||
| a | head | 0 | male norn | 0 | baby | 0 | Slot 0 |
| b | body | 1 | male grendel | 1 | child | 1 | ... |
| c | left thigh | 2 | male ettin | 2 | adolescent | 2 | |
| d | left leg | 3 | male geat | 3 | youth | 3 | |
| e | left foot | 4 | female norn | 4 | adult | 4 | |
| f | right thigh | 5 | female grendel | 5 | old | 5 | |
| g | right leg | 6 | female ettin | 6 | ancient | 6 | |
| h | right foot | 7 | female geat | 7 | |||
| i | left upper arm | 8 | |||||
| j | left arm + hand | 9 | |||||
| k | right upper arm |
|
Letters a-z |
||||
| l | right arm + hand | ||||||
| m | tail base | ||||||
| n | tail tip | ||||||
3. The
actual Slot Conversion
What you do now, is make sure you have all the necessary files from a breed.
You can for instance search your image directory for the necessary files, or
you can unzip a breed in a seperate folder and work from there.
With all your files located together you will now be able to alter them. For
reslotting this entails changing the fourth and optionally the second number
in the name of each file.
Example: You have two breeds you like which occupy Norn slot B (the male
teen sprites would be labelled *02b, the female *42b) and you want to change
one of those to Ettin E. What you do is change every single att and sprite
file from one of those breeds to look like: *22e for males and *62e for the
females. The change from 0 to 2 and 4 to 6 indicates you're changing your
breed to an ettin slot, the change from a to e tells you which slot you'll
be using.
Now all you have to do is put the renamed files in the appropriate folders
and change the genetics file to use the correct appearance genes, or use a file that's
already on the slot as a replacement.
1. Creatures 1
C1 sprite files have a .spr file ending. In C1 the sprite files are
pretty basic: every sprite file, except the head has 10 different poses: 4 facing
left, 4 facing right and 1 each for front and back. The head has 26 sprite
files: 4 facing left with eyes open, 4 facing right with eyes open, then
front normal, back, front happy, front angry and front tired. Then a repeat
of the same bitmap images but this time with eyes closed. In later games
more poses are added which makes it more complex. In C1 you have no way of
knowing how a norn feels when they're moving sideways. Only when facing the
camera can you make out their expressions.
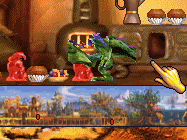
The official spritesizes are a multiple of 4 in width, if you don't do this,
you'll end up with garbled sprites. Also make sure to have enough black
space to either side of the sprites because otherwise you might get extra
lines (examples of both below).
ending: .spr
program: Onestop
Sprite Workshop
2. Creatures
2
In C2 the head sprite file (a) will become
somewhat more elaborate. There are 2 new expressions (scared and sad)
and they are arranged differently so that you can see their expression
when they are walking sideways:
4 facing left (eyes open), 4 facing right (eyes
open), front view, back view, then the same with eyes closed.
Repeat this for every expression (alternating eyes
open and eyes closed). There are a total of 120 bmp's used for the head
sprite.
Other body parts stay the same as C1.
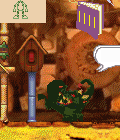
C2 is very tolerant, no wrapping effect, you can
do as you please, only make sure that the background is black. Or you
will have squares around your norns (see below).
ending: .s16
program: Onestop
Sprite Workshop
program:
spritebuilder
3. Creatures 3 & DS
Due to the 3D effect, a lot of bmp's are added to
the sprites. Normal sprite files consist of 16 bitmaps now: 4 facing left, 4
facing right, 4 facing camera, 4 looking away, where the front and
back-facing poses have angles to differentiate them looking up and down. Now
think of the heads with all their expressions and you won't be surprised to
find that a C3/DS head sprite consists of 192 bitmap images. That's a lot
(especially when you're editing). Another change is that body sprites now
contain 64 bitmap images to allow for changes during pregnancy (and yes both
male and female sprite files have them) 4 full sets of body poses allow for
pregnant creatures to go from flat-bellied to very pregnant gradually.
Normal C3 sprites are big squares, sides a
multiple of 4, however this again is not needed. Better make the
backgrounds big and black though. If some of your sprites lack the black
background, they will crash your game as I've so often experienced.
ending: .c16
tool: spritebuilder
ATT
Body Data can be a bit
fiddly and boring but it is not hard to understand. Export some sprite files
poses, or create your own and then you're ready to start attaching body parts. You need a drawing program that states
coordinates, Paint for example, and something to write the numbers
in, like Wordpad. The best way of making att files for your own breed is to see where
the att-points of the official breeds go...and then using a similar place on your sprites.
This way ensures that your breeds will be able to breed properly with other
breeds without having very strange floaty body parts.
There is
an att file for each sprite file. Every att file consists of a few rows
and columns of numbers that tell the game where to attach those two body parts. (0,0)
is always the upper left of an image.
ATT Rows
The rows coordinate with the pose. So the first row of att conveys the
attachment points for the first pose ("0") in a sprite file. It can
help to add an empty line after each 4 lines to remember where you're at.
Luckily, you only need 10-16 rows of att for a sprite file: 4 facing left poses,
4 facing right poses and then the front and back poses, which are 2 lines for C1
and C2 and 8 lines for C3/DS.
ATT Columns
A for the head has 4 columns...
1+2: head to body
3+4: mouth position
B for body (this has a lot of
columns)...
1+2: head
3+4: left
leg
5+6: right leg
7+8: left arm
9+10: right arm
11+12: tail
For the next att-files you'll notice some pattern. The first 4 numbers in every x (first of two) will be the mirror images of the x numbers in the second set of 4 numbers (if you mirrored your sprites that is). The Y should stay the same, as you want your body parts attached at the same height. This also applies for the third and fourth set of 4 numbers (back and front).
C
(left) and
F (right): upper
legs
1+2: body
3+4: knee
D
(left) and
G (right): lower
legs
1+2: knee
3+4: feet
E
(left) and
H (right): feet
1+2: lower legs
3+4: ground (believe me this is necessary: I had
skywalking grendels in C1 once)
I
(left) and K (right): upper
arms
1+2: body
3+4: hands
J
(left) and L
(right): hands
1+2: upper arms
3+4: items (holding for instance honey)
M and
N are used for the tail, there is
none in C1, so you only need to do these in C2 and C3.
1+2:
body
3+4:
your guess is as good as mine, these are usually all zero
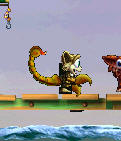
ATT TROUBLESHOOTING
When body data goes awry, bodyparts start floating. I recently found
out that C1 can be pretty finnicky about the number of data present. The Boid
conversion for instance had head body data with some extra columns. All of these
columns had zeroes in them... and yet just that made their heads float somewhere
around their thigh (see below).
GENETICS
The final thing you need
to know about creatures is that they carry genetic information. Each creature in
your world is unique and will have inherited parts of both of it's parents
genes. You can open and edit creature gene files with the appropriate Genetics
Kit.
Each gene has a number of traits that designates when the gene activates (at
what age), if it can be mutated and how high the chance of mutation is.
The different genes are split into several categories:
Creature:
Genus:
This determines what type of creature will hatch: norn, ettin, grendel or geat.
In C1 you can't shift slots like you can in the other games.
Appearance:
This determines which slot to use. Several genes for head, body, arms, legs and
tail. Mix and Match =)
Pigment: Comes in groups of 3 (red, blue and
green), overlays a certain colour to sprites
Pigment Bleed: Rotates
a sprite's colour.
Facial Expression:
Determines when a certain facial expression is used (eg. when fear = 1, show
fearful expression)
Pose: designates a
number per body part, creates a static pose which will be used in the gait genes
Gait: Strings a couple of poses together to form
a way of movement.
Instinct: Some
automatic behaviours for your creatures.
Stimulus: Interesting
to tweak, designates what certain actions do. You can make your creatures super
efficient or strong with these.
Organ:
These
are actually headers under which other genes are grouped (e.g. the gonad organ
has all genes related to breeding).
Word is that a new organ is best placed
completely at the end to not cause strange/disabled offspring.
Brain:
I
honestly haven't messed with these.
Biochemistry:
Initial
Concentration: Designates the starting amount for each chemical
Halflife:
Designates how fast a chemical disappears in a creature.
Chemical Emitter:
Designates when and how fast a certain drive mounts or chemical increases (eg.
when pregnant, females make progesterone). .
Chemical Receptor:
Designates whether an organ is susceptible to a certain chemical. Effects can be
bad (damage), neutral (sex drive, aging) or good (healing)
Chemical Reaction:
Handles effects that chemicals have (eg adding the right cure cancels out a
disease).